Saturday, July 25, 2020

Monitoring the performance of microservice

Hi friends,

In this post, I'm sharing the very important concept of monitoring the performance of microservice using OpenCensus and Zipkin.


Question 1:

How do you monitor the performance of microservice?

Answer:


For monitoring the performance of microservice, I have used OpenCensus and Zipkin tools.

OpenCensus is an open-source project started by google that can emit metrics and traces when it integrates within application code to give us a better understanding of what happens when the application is running.

So, means we have to instrument our application. Instrumentation is how our application produce the events that will help us to have a better understanding of a problem when debugging in production.

For using OpenCensus, we need to integrate it into our code.
Instead of having to manually write code to send traces and metrics on the application while it is running, we just use the OpenCensus libraries.

These libraries exist in several programming languages. By using these libraries as frameworks, we can collect commonly used predefined data.
The data that OpenCensus collects is divided into two groups : metrics and traces.

But how can we see the metrics and traces that OpenCensus collects? By using exporters.

Exporters are the mechanism that we use to send those metrics to other sources (also known as backends) like Prometheus, Zipkin, Stackdriver, Azure Monitor etc.


Metrics: These are the data points that tell us about what is happening in the application e.g. : latency in a service call or user input.

Traces: These are the data that can show how the initial call propagates through the system. Traces help you to find exactly where the application might be having problems.


How does OpenCensus help you?

We can tag every request with an unique ID. Having a unique identifier helps us to correlate all the events involved in each user call, creating a single context.


Once we have the context,  OpenCensus helps us expand it by adding traces. Each trace that OpenCensus generates will use the propagated context to help you to visualize request's flow in the system. Having traces allows us to know information like how much time each call took and where exactly the system needs to improve. From all the calls generated, we might identify that the user input has data that we didn't consider and that's what causing a delay in storing data in the cache.

Configure OpenCensus:

Maven Configuration:

<dependency>
    <groupId>io.opencensus</groupId>
    <artifactId>opencensus-api</artifactId>
    <version>${opencensus.version}</version>
</dependency>

<dependency>
    <groupId>io.opencensus</groupId>
    <artifactId>opencensus-impl</artifactId>
    <version>${opencensus.version}</version>
</dependency>


<dependency>
    <groupId>io.opencensus</groupId>
    <artifactId>opencensus-exporter-trace-zipkin</artifactId>
    <version>${opencensus.version}</version>
</dependency>


Inside main() method:

//1. Configure exporter to export traces to Zipkin.

ZipkinTraceExporter.createAndRegister("http://localhost:9411/api/v2/spans", "tracing-to-zipkin-service");

OpenCensus can export traces to different distributed tracing stores (such as Zipkin, Jeager, StackDriver trace). We configure OpenCensus to export to zipkin, which is listening on localhost port 9411 and all of the traces from this program will be associated with a service name tracing-to-zipkin-service.


Configure Sampler:
Configure 100% sample rate, otherwise few traces will be sampled.

TraceConfig traceConfig = racing.getTraceConfig();
TraceParams activeTraceParams = traceConfig.getActiveTraceParams();
traceConfig.updateActiveTraceParams(activeTraceParams.toBuilder().setSampler(Samplers.alwaysSample()).build());


Using the Tracer:
To start a trace, we first need to get a reference to the tracer. It can be retrieved as a global singleton.

Tracer tracer = Tracing.getTracer();


Create a Span:

To create a span in a trace, we used the tracer to start a new span. A span must be closed in order to mark the end of the span. A scoped span implements AutoCloseable, so when used within a try block in java 8, the span will be closed automatically when existing the try block.

try(Scope scope = tracer.spanBuilder("main").startScopedSpan()){
        for(int i = 0; i< 10; i++){
            doWork(i);
        }

}


Using Zipkin:


Zipkin is a java based distributed tracing system to collect and lookup data from distributed systems.

Too many things could happen when a request to an HTTP application is made. A request could include a call to a database engine, to a cache server or any other dependency like another microservice. That's where a service like Zipkin can come in handy.

Zipkin is an open source distributed tracing system based on Dapper's paper from google. Dapper is google's system for its system distributed tracing in production.

Zipkin helps us find out exactly where a request to the application has spent more time.
Whether it is an internal call inside the code or an internal or external API call to another service, we can instrument the system to share a context. Microservices usually share context by correlating requests with a unique ID.


Zipkin Architecture:


Zipkin Components:

  • Collector
  • Storage
  • Search
  • Web UI


Using Zipkin:

  • Need to add dependency for Zipkin in pom.xml and also add dependency for Zipkin UI.

<dependency>
    <groupId>io.zipkin.java</groupId>
    <artifactId>zipkin-server</artifactId>
    <version>2.11.7</version>
</dependency>


<dependency>
    <groupId>io.zipkin.java</groupId>
    <artifactId>zipkin-autoconfigure-ui</artifactId>
    <version>2.11.7</version>
</dependency>


  • Add @EnableZipkinServer annotation on main Springboot application.

Open application.properties in resources and mention following properties:

  • spring.application.name = zipkin-server
  • server.port = 9411 (default port)
  • spring.main.allow-bean-definition-overriding = true   (Used when some other bean with same name has already been defined.)
  • Management.metrics.web.server.auto-time-requests = false  (If prometheus says, there are to meters with same name but different tags names)


That's all for this post.
Thanks for reading!!

Monday, July 13, 2020

Amazon AWS interview

Hi friends,

In this post, I'm sharing questions answers on AWS services which are  asked now a days.


Question 1:

How are EC2 and RDS used in production?

Answer:

For deploying java application on AWS EC2, we should have the following:

  • An account on Amazon Web Services, so that we can login to console and do some settings and some changes.
  • Then we need to have a terminal with SSH support, so that we can connect to amazon EC2 instance.
  • Then we need to have the PEM file generated from the AWS which is a security file for the amazon EC2 instance to which we want to connect.By going to amazon web console, we can generate PEM file and can use it to connect to amazon EC2 instance.
  • We need to have the IP address of EC2 instance, so that we can connect to it.
Now, we need to execute below given command to connect to our EC2 instance remotely:

ssh ec2-user@ip-address -i PEMfile

Now, we are connected to our EC2 instance. Now we check whether we have JDK installed on it or not.
We can run java -version and we can check whether java is installed or not.

Now just copy the command to install JDK from Oracle website and paste it into terminal. It will download the JDK into EC2 instance.
Now, we need to run the JDK install command. So, it will install Java on EC2 instance.

Now, we need to clone our project from github to EC2 instance.

Now, make a directory called workspace in home directory of EC2 instance and then run git clone <path> command and the project will be cloned in workspace folder.

Now, we need to expose port 5000 , so that anybody can connect to our java application.
For that we need to go to AWS console and Network and Security -> Security Groups , we need to create a new security group with port 5000.

And, now we can run our application using ip address/port/our Rest endpoint.


RDS: Relational Database Service:

For using RDS in AWS, we need to create separate Security group for configuring it by going to amazon console as discussed in previous question.

Now, we need to create an instance of RDS by clicking on Instances tag on left panel on AWS console.

Now search for RDS in search bar and it will open Amazon RDS window.
Click on instances tab on left panel.
It will ask you to create DB instance: Amazon Aurora, MySQL, SQL Server, MariaDB, PostgreSQL, Oracle etc.
Now lets select MySQL, then it asks for Choose use cases: Production, Dev/Test etc.
Select Dev/Test for example.

Now under settings: mention db instance name.
Now "Specify DB Details" screens appears. We can select MySQL version here.

We can also select for creating replica on different zones.
Also allocate storage e.g. 20 GB.
Now, provide master username and password.

Also, set the accessibility of the database: public or local. Now, it will launch RDS instance.
So it may take few minutes to create DB instance.
When we click our newly created db instance, we can see that we have a endpoint and port created.


So just open MySQL workbench and in "setup new connection" window, pass endpoint created above in Hostname field. Port will be default or use as got in above section.

Now, just pass username and password and click on Test Connection.
Now, we are connected to our new database that we just created above.
For any VPS security, we can add Inbound rules under Security groups.

Now, we have a connection entry created in Workbench. Click on it and it shows MySQL workbench default view, where we can type commands and interact.

Now, we can create database and tables as we do in MySQL.


Question 2:

How to configure and use AWS storage S3?

Answer:

AWS S3 is the storage service of the internet, where we can store and retrieve any amount of  data, at any time, from anywhere on the web.

S3 is durable, flexible, cost efficient, scalable, available and highly secure.


For using AWS storage S3, we first need to configure it.
So, steps to configure S3 is:

  • Open AWS Console. Login into it. Go to Services->Storage-> S3
  • Now we need to create a bucket and provide bucket name, region etc. Also need to mention public permissions. Now , clicking on create bucket button, it creates a S3 bucket.
  • Now , we can create folders and upload files in this bucket.
  • For every uploaded file, S3 provides a URL as well to access it.

Amazon S3 is used to store the types of data which are not required on daily basis. e.g. It can be used to store any kind of certificates which are not used daily.

e.g. A hospital can use S3 to store birth certificates.


S3 works on the concepts of buckets and objects.
Bucket is like a container and object can be any file.
S3 is free for 1 year with some limitations from amazon.


Question 3:

What do you know about AWS Lambda?


Answer:

AWS Lambda allows us to run the code without doing any provisioning or managing any server.
We just need to write source code and upload it to Lambda and it will run it. That means, we don't need to manage any server.

Lambda handles scaling of our application automatically in response to each trigger our application receives.
We only have to pay for the amount of time for which our code is running.
AWS Lambda is one of the services that falls under the compute domain of services that AWS provides.

Use case of Lambda:

Whenever we are getting some videos or images which are in raw format and we need these files in thumbnails format, then for every file upload in S3, it will trigger AWS Lambda and lambda will format that raw file into a thumbnail that can be used by any client.


How does Lambda work?

When a lambda function gets a request, it sends it to one container. But when the number of requests increases, in creates more containers and balances the load.
When number of requests decreases, lambda will reduce the containers that helps in saving costs.

Even we only need to pay for the amount of time these containers are running.
AWS lambda also handles the backing up of the data.

We need to create two S3 buckets , on one we will upload the data and another bucket will be used for backing up the data. And we also need to specify one IAM rule to provide communication between these two buckets. And we require lambda function to copy the data from source bucket to destination bucket.
The lambda function is triggered everytime there is a change in the metadata of the bucket.


Thanks for reading!!


Friday, July 10, 2020

Mongo DB Replication interview

Hi friends,

In this post, I'm sharing interview questions on Mongo DB replication and configuration.


Question 1:

Why we need replication in Mongo DB?

Answer:

Mongo DB replication has two benefits:

  • If one database node is down, we can get data from other nodes.
  • Replication can also be done for the purpose of load balancing.


Question 2:

How to setup replication in Mongo DB?

Answer:

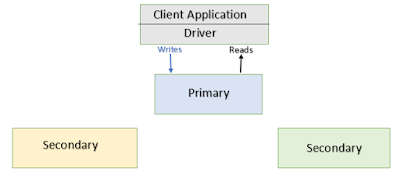
In Mongo db , replication process can be setup by creating a replica set. In Mongo db, a replica set contains multiple Mongo db servers. In this group of Mongo db servers, one server is known as a primary server and others are known as secondary servers.

Every secondary server always keeps copies of the primary's data. So, if anytime the primary server goes down, then the new primary server is selected from the existing secondary servers and process goes on.
The replication process works as below with the help of a replica set:

Replica set is a group of one or more standalone mongo db servers [Normally, 3 Mongo db servers are required].

In a replica set, one server is marked as primary server and rest are marked as secondary server.

Data writes into the primary server from the application first. Then all the data replicates to the secondary servers from the primary server.

When the primary server is unavailable due to hardware failure or maintenance work, the election process starts to identify the new primary server and select a primary server from the secondary lists.

When the failed server recovered, it will again join the replica set as a secondary server.


Question 3:

How to configure replication in Mongo DB?

Answer:

I will tell here , how to convert a standalone Mongo db instance into a replica set. This process is not an ideal process for the production environment. Because in production environment, if we need to establish a replica set, then we need to provide three different Mongo db instances for the replica set.

Step 1:

Start a mongo shell with the --nodb options from the command prompt. It will start a shell without any connection with the existing mongodb instance.

Command is : mongo --nodb

Step 2:

Now, create a replica set with the below commands:

replicaSet = new ReplSetTest({name:'rsTest', nodes : 3})

This command instructs the shell to create a replica set with three node servers: one primary and two secondaries.

Step 3:

Now run the below commands one by one to start the mongo db server instances:

1. replicaSet.startSet() - This command starts the three mongo db processes.
2. replicaSet.initiate() - This command configures the replication.

Now, we have three mongo db processes locally on ports port1, port2, port3 [These will be integer values]. 

Step 4:

Now open another command prompt and connect the mongo db running on port port1.

1. conn1 = new Mongo("localhost:port1");
2. connection to localhost:port1
3. rsTest : PRIMARY>

Note that, when we connect a replica set member, the prompt changes to rsTest: PRIMARY. Here PRIMARY is the state of the member and rsTest is the identifier of the replica set.


Question 4:

How to change replication configuration?

Answer:

After defining a replica set, we can change the replica set at any time. We can add new members , remove any existing members.

There is a mongo shell helper method is available to add new replica set members or remove existing replica set members. 

To add a new member into the replica set, we need to run the below command:

rs.add("server-4: 20005")

Similarly, we can remove any members from the existing replica set using the below command:

rs.remove("server-2:20002")

If we need to check the existing configuration of the replication, then we need to run the below command in the shell:

rs.config()  


Question 5:

How does syncing work in Mongo DB?

Answer:

The main objective of the replication process is to keep the same or an identical set of data on multiple servers.  For performing this task, MongoDB always maintains a log of operations or oplog which contains every write information into the primary server. This log is a collection that exists in  the local database on the primary server.
The secondary  servers are queries of this collection for obtaining the operation details so that they can replicate that data.

Every secondary server maintains it's own oplog where Mongo db captures each operation related to the replication process from the primary server.These log files allow any replica set members to use as a sync source for other members.

The secondary server always first fetches the information related to the pending operations from the primary members, then apply that operation to their own data set and then writes down the logs about that operation into the oplog.


That's all for this post.
Thanks for reading!!


Thursday, July 9, 2020

Coding interview questions in java: Part - 1

Hi Friends,

In this post I am sharing coding interview questions asked in java interviews.


Question 1:

Write the code for custom BlockingQueue in java.

Answer:

There are two custom implementations of BlockingQueue: Using Synchronization and using Lock and Condition objects.

Using synchronization:

public class CustomBlockingQueue{

    int putPtr, takePtr;
    Object[] items;
    int count = 0;

    public CustomBlockingQueue(int length){

        items = new Object[length];
    }

    public void synchronized put(Object item){
    
        while(count == items.length()){
            try{
              wait();
            }
            catch(InterruptedException e){

            }
            items[putPtr] = item;
            if(++putPtr == items.length)
                putPtr = 0;
        
            count++;
            notifyAll();

        }

    }

    public void synchronized take(){

        while(count == 0){    
            try{
                wait();
            }
            catch(InterruptedException e){

            }
        }
        Object item = items[takePtr];
        if(++takePtr == items.length)
            takePtr = 0;

        --count;
        notifyAll();
    }


Using Lock and Condition object:


public class CustomBlockingQueue{

    final Lock lock = new ReentrantLock();
    final Condition notFull = lock.newCondition();
    final Condition notEmpty = lock.newCondition();

    public Object[] items = new Object[100];
    int putPtr, takePtr, count;
         

    public void put(Object item) throws InterruptedException{
        lock.lock();
        try{
            while(count == items.length)
                notFull.await();
            items[putPtr] = item;
            if(++putPtr = items.length)
                putPtr = 0;
            ++count;
            nonEmpty.signal();

        }
        finally{
            lock.unlock();
        }


    }


    public Object take() throws InterruptedException{
        lock.lock();
        try{
            while(count == 0)
                notEmpty.await();
            Object x = items[takePtr];
            if(++takePtr == items.length)
                takePtr = 0;
            count--;
            notFull.signal();
            return x; 

        }
        finally{
            lock.unlock();

        }
    }
}


Question 2:

Write the code for custom ArrayList in java.

Answer:


public class CustomArrayList{

    public Object[] items;

    public int ptr;

    public CustomArrayList(){
        items = new Object[100];
    }

    public void add(Object item){
        if(items.length - ptr == 5){
            increaseListSize();
        }
        items[ptr++] = item;

    }

    public Object get(int index){
        if(index < ptr)
            return items[index];
        else{
            throw new ArrayIndexOutOfBoundsException();
        }
        
    }

    private void increaseListSize(){
        items = Arrays.copyOf(items, items.length*2);
    }
}


Question 3:

Write the code for implementing own stack.


Answer:

public class CustomStack{

    private in maxSize;
    private long[] stackArray;
    private int top;

    public CustomStack(int size){
        maxSize = s;
        stackArray = new long[size];
        top= -1;
    }

    public void push(long l){
        stackArray[++top] = l;

    }

    public long pop(){
        return stackArray[top--];

    }

    public long peek(){
        return stackArray[top];

    }

    public boolean isEmpty(){
        return (top == -1);
    }


}


Question 4:

Write the code for implementing own Queue.


Answer:

public class CustomQueue{

    private int[] arrQueue;
    private int front , rear;

    public CustomQueue(int size){

        arrQueue[size] = new int[];
        front = rear = -1;
    }

    public void insert(int item){

        if(rear == -1){
            front = rear = 0;
        }
        else{
            rear++;
        }

        if(arrQueue.length == rear)
            increaseQueueSize();     

        arrQueue[rear] = item;

    }


    public int remove(){
        if(arrQueue.length == 0)
            throw new NoSuchElementException();

        int elem =  arrQueue[front];

        if(front == rear){
            front = rear = -1;
        }
        else
            front++;

        return elem;
    }


    public void increaseQueueSize(){
        arrQueue = Arrays.copyOf(arrQueue, arrQueue.length*2);

    }

}


That's all for this post.
Thanks for reading!!
Saturday, July 4, 2020

Microservice Interview @ Sapient - Part-1

Hi Friends,

In this article, I'm sharing interview questions asked on microservices and it's patterns.


Question 1:

What principles microservice architectures has been built upon?

Answer:

  • Scalability
  • Availability
  • Resiliency
  • Flexibility
  • Independent, autonomous
  • Decentralized governance
  • Failure Isolation
  • Auto-Provisioning
  • Continuous delivery through DevOps
Adhering to the above principles brings several challenges and issues while bring our system to live.
These challenges can be overcome by using correct and matching design pattern.


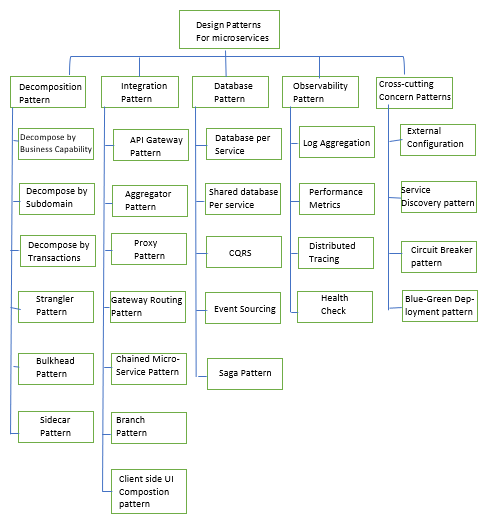
Question 2:

What types of design patterns are there for microservices?

Answer:


Question 3:

Explain in detail Decomposition patterns.

Answer:

  • Decompose by Business capability: This pattern is all about making services loosely coupled  and applying the single responsibility principle. It decomposes by business capabilities. Means define services corresponding to business capability. It is something that a business does in order to generate values. A business capability often corresponds to a business object, e.g.:
    • Order management is responsible for orders
    • Customer management is responsible for customers
            
  • Decompose by Subdomain: This pattern is all about defining services corresponding to Domain-Driven-Design [DDD] subdomains.  DDD refers to the application's problem space - the business - as the domain. A domain consists of multiple subdomains. Each subdomain corresponds to a different part of the business.  Subdomains can be classified as follows:
    • Core
    • Supporting
    • Generic
The subdomains of Order management consists of:
    • product catalog service
    • Inventory management service
    • Order management services
    • Delivery management services


  • Decompose by transactions/Two-Phase commit pattern : This pattern can decompose services over transactions. There will be multiple transactions in a system. One of the important participants in a distributed transaction is the transaction coordinator. The distributed transaction consists of two steps:
    • Prepare phase
    • Commit phase

  • Sidecar Pattern: This pattern deploys components of an application into a separate processor container to provide isolation and encapsulation. This pattern can also enable applications to be composed of heterogeneous components and technologies. It is called sidecar as it resembles to a sidecar of a bike. In this pattern, a sidecar is attached to an application and provides supporting features for the application.  


Question 4:

Explain in detail Integration patterns.

Answer:

  • API Gateway Pattern: When an application is broken down into multiple microservices, there are a few concerns that need to be considered:
    • There are multiple calls for different microservices from different channels
    • There is a need for handling different type of protocols
    • Different consumer might need a different format of the responses.
An API gateway helps to address many of the concerns raised by the microservice implementation, not limited to the ones above.
    • An API gateway is the single point of entry for any microservice calls.
    • It can work as a proxy service to route a request to the concerned microservice.
    • It can aggregate results to send back to the user.
    • This solution can create a fine-grained API for each specific type of client.
    • It can also offload the authentication/authorization responsibility of the microservice.


  • Aggregator Pattern:  This pattern helps aggregate the data from different services and then send the final response to the client. This can be done in two ways:
    • A composite microservice will make calls to all the required microservices, consolidate the data and transform the data before sending back.
    • An API gateway can also partition the request  to multiple microservices and aggregate the data before sending it to the consumer. An API gateway can have different modules:
      • Mobile API
      • Browser API
      • Public API


Question 5:

Explain in detail the database patterns, you have worked upon.

Answer:

To define the database architecture for microservices, we need to consider the below points:

  • Services must be loosely coupled.They can be developed, deployed and scaled independently.
  • Business transactions may enforce invariants that span multiple services.
  • Some business transactions need to query data that is owned by multiple services.
  • Databases must be sometimes replicated and shared in order to scale.
  • Different services have different data storage requirements.

  • Database per service: To solve the above concerns, one database per service must be designed. It must be private to that service only. It should be accessed by the microservice API only. It cannot be accessed by other services directly. e.g.: for relational database, we can use private-tables-per-service, schema-per-service or database-server-per-service.
  • Shared database per service: This pattern is useful when we have an application which is monolith and we try to break it into microservices. 
  • Command Query Responsibility Segregation [CQRS]: Once we implement database per service, there is a requirement to query, which requires joint data from multiple services, it's not possible. CQRS suggests splitting the application into two parts: the command side and the query side.    
    • The command side handles the create, update and delete requests.
    • The query side handles the query part by using the materialized views. 
The event sourcing pattern is generally used along with it to create events for any data change.
Materialized views are kept updated by subscribing to the stream of events 


  • Event Sourcing Pattern:  This pattern defines an approach to handling operations on data that is driven by a sequence of events , each of which is recorded in an append-only store. Application code sends a series of events that imperatively describe each action that has occurred on the data to the event store, where they're persisted. Each event represents a  set of changes to the data.


  • Saga Pattern: When each service has it's own database and a business transaction spans multiple services, how do we ensure data consistency across services? Each request has a compensating request that is executed when the request fails. It can be implemented in two ways:
    • Choreography: In microservice choreography, each microservice performs their actions independently. It does not require any instructions. It is like the decentralized way of broadcasting data known as events. The service which are interested in those events , will use it and perform actions. It is like an asynchronous approach.
    • Orchestration:  In the microservice orchestration, the orchestration handles all the microservice interactions. It transmits events and responds to it.  The microservice orchestration is more like a centralized service. It calls one service and waits for the response before calling the next service. This follows a request/response type paradigm.


That's all for this post.
Thanks for reading!!

CAP Theorem and external configuration in microservices

 Hi friends, In this post, I will explain about CAP Theorem and setting external configurations in microservices. Question 1: What is CAP Th...